DigiDash/AVR Development Tutorial
This tutorial will help you get started programming your DigiDash device. We
will go through an example of putting an image on the device.
The DigiDash uses an 8-bit Atmel mega128 processor. This gives you 4k of RAM,128k
of Program Memory, 4k of EEPROM memory. The processor runs at 16Mhz.
AVR Memory type differences:
RAM (4K)
This is the active memory area for your device. It stores global and local variables
here as well as the stack.
Program Memory (128k)
This is where your code is stored -your bitmap images and strings should be
stored here too by defining them in the .h files.
EEPROM Memory (4K)
Data stored here will be available after power cycles. Use this memory for things
that need to be stored and retreived if the device is power cycled. This could
include things like user settings, gauge layouts preferences, Previous Megasquirt
firmware, etc.
Now, on with the development environment and an example of loading an MS Paint
image onto the display.
Use these tools:
1. WinAVR (AVR-GCC)
2. AVRstudio
(Programming IDE)
3. AVRstudio Service
Pack 4 (update)
4. GIMP (converting images to
.xbm format)
5. MS paint (to create image)
IDE setup Procedure:
1. Install WinAVR; this is your C programming library to use
with AVRstudio. There are many common C routines already written for you. You
include these when writing your C programs on the AVR processor. Most of them
are included somewhere in the DigiDash project, but if you need them for your
own reference use these materials:
To see these routines, for your own reference,
Check out the WinAVR folder located usually at: c:\WinAVR\avr\include\
To see the names of Interrupt Service Routines, Port Names, Register Names check
out the WinAVR device description file for the mega128 usually located close
by at: c:\WinAVR\avr\include\avr\iom128.h
Also you can download the Atmel mega128 datasheet for reference if you want
**Tip: for AVR programming help and reference check
out the AVRfreaks forum
2. Install AVRstudio and Service Pack 4; this
is your programming IDE. It is free, and easy to use. Inside the DigiDash source
there always will be project file for DigiDash usually called DigitalDash.aps
-Open this file to open the project.
3. DigiDash File structure:
DigitalDash.c (main loop and inits)
graphicslib.c (many LCD graphics routines)
gui.c (some of the user interface)
msns-extra.c (megasquirt specific functions)
bitmaps.h (location of the many bitmap images)
**Tip: Look at the header (.h) for each of the
.c files to see their functions
Compiling:
1. Open the project file named DigitalDash.aps in AVRstudio.
2. Click the Make button
3. If successful Make, grab the Flash .hex file usualy located here ../DigiDash-src-Directory/default/DigitalDash.hex
4. Download the .hex file to the device using BLIPS
Bitmap Image Tutorial:
5 . Install GIMP; this is used to create the image format that
can be easily displayed graphically on the LCD screen.
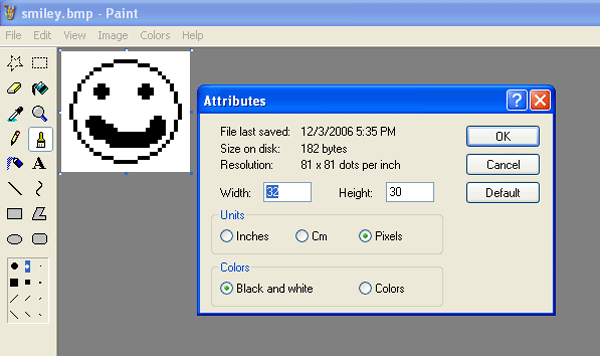
6 . Draw the image; create an image in MS paint for the display.
I like to make the width of the picture as a multiple of 8 pixels. The max height
can be up to 128 pixels. Try to make the image as small as possible because
they take up LOTs of space and you only have 128k of program memory; at the
time of this document, 43% of the display's memory is used up.
Calculating Image size (in pixels):
(width* height) / 8 = image size in bytes
So, for a full screen image; (240*128)/8 = 3.84 kilobytes
Compared to the size of program memory (128k), you have taken up alot of space.
So try to avoid large images, and stick with making smaller icons.

7 . Save image as a monochrome (black & white) bitmap
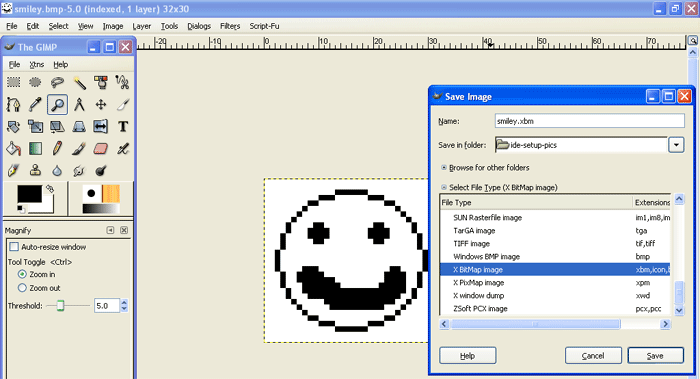
8 . Open bitmap image in GIMP. You convert your image (from
whatever format you choose) to X-bitmap (.xbm) format. xbm format is like a
text file except its a C header declaration! Very convienient for you. You can
play around with GIMP's dithering to make the image look the way you like.

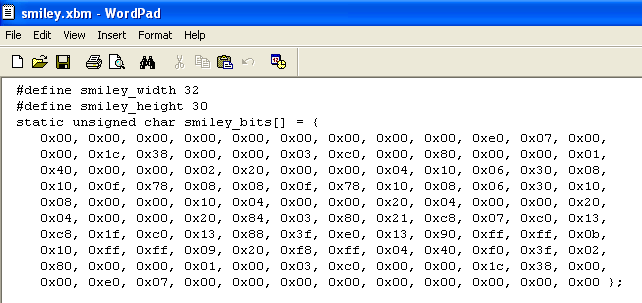
9 . Open .xbm image in Wordpad. Shown, below is an example
.xbm file. This is what you are interested in. Lets modify that to make it work
in the DigiDash project.

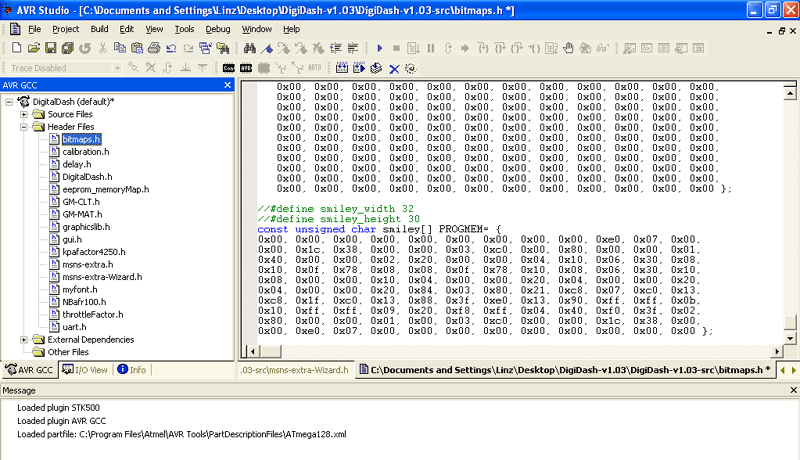
10. Change C char array declaration to tell the compiler to
store this image in Program Memory. I usually like to keep the size information
about the image (first two lines of the .xbm file) by commenting them out. This
heps later if you need to know the dimensions of your image.
Change from this:
#define smiley_width 32
#define smiley_height 30
static unsigned char smiley_bits[] = {
0x00, 0x00, 0x00, 0x00, 0x00, 0x00, 0x00, 0x00, 0x00, 0xe0, 0x07, 0x00,
0x00, 0x1c, 0x38, 0x00, 0x00, 0x03, 0xc0, 0x00, 0x80, 0x00, 0x00, 0x01,
0x40, 0x00, 0x00, 0x02, 0x20, 0x00, 0x00, 0x04, 0x10, 0x06, 0x30, 0x08,
0x10, 0x0f, 0x78, 0x08, 0x08, 0x0f, 0x78, 0x10, 0x08, 0x06, 0x30, 0x10,
0x08, 0x00, 0x00, 0x10, 0x04, 0x00, 0x00, 0x20, 0x04, 0x00, 0x00, 0x20,
0x04, 0x00, 0x00, 0x20, 0x84, 0x03, 0x80, 0x21, 0xc8, 0x07, 0xc0, 0x13,
0xc8, 0x1f, 0xc0, 0x13, 0x88, 0x3f, 0xe0, 0x13, 0x90, 0xff, 0xff, 0x0b,
0x10, 0xff, 0xff, 0x09, 0x20, 0xf8, 0xff, 0x04, 0x40, 0xf0, 0x3f, 0x02,
0x80, 0x00, 0x00, 0x01, 0x00, 0x03, 0xc0, 0x00, 0x00, 0x1c, 0x38, 0x00,
0x00, 0xe0, 0x07, 0x00, 0x00, 0x00, 0x00, 0x00, 0x00, 0x00, 0x00, 0x00 };
To this:
//#define smiley_width 32
//#define smiley_height 30
const unsigned char smiley[] PROGMEM= {
0x00, 0x00, 0x00, 0x00, 0x00, 0x00, 0x00, 0x00, 0x00, 0xe0, 0x07, 0x00,
0x00, 0x1c, 0x38, 0x00, 0x00, 0x03, 0xc0, 0x00, 0x80, 0x00, 0x00, 0x01,
0x40, 0x00, 0x00, 0x02, 0x20, 0x00, 0x00, 0x04, 0x10, 0x06, 0x30, 0x08,
0x10, 0x0f, 0x78, 0x08, 0x08, 0x0f, 0x78, 0x10, 0x08, 0x06, 0x30, 0x10,
0x08, 0x00, 0x00, 0x10, 0x04, 0x00, 0x00, 0x20, 0x04, 0x00, 0x00, 0x20,
0x04, 0x00, 0x00, 0x20, 0x84, 0x03, 0x80, 0x21, 0xc8, 0x07, 0xc0, 0x13,
0xc8, 0x1f, 0xc0, 0x13, 0x88, 0x3f, 0xe0, 0x13, 0x90, 0xff, 0xff, 0x0b,
0x10, 0xff, 0xff, 0x09, 0x20, 0xf8, 0xff, 0x04, 0x40, 0xf0, 0x3f, 0x02,
0x80, 0x00, 0x00, 0x01, 0x00, 0x03, 0xc0, 0x00, 0x00, 0x1c, 0x38, 0x00,
0x00, 0xe0, 0x07, 0x00, 0x00, 0x00, 0x00, 0x00, 0x00, 0x00, 0x00, 0x00 };
The PROGMEM descriptor tells the compiler to put the char array
into Program Memory instead of RAM.
11 . Copy and paste the above into bitmaps.h

12. Use the following function to display the bitmap:
(snippet from gui.h)
extern void draw_bmp(const
unsigned char* img, unsigned char x,unsigned
char y, unsigned char width,unsigned
char height);
Like this:
draw_bmp(smiley, 1, 1, 32, 30); //This will draw smiley at location (1,1)
Good luck!
-Christopher Ladden (christopher.ladden@gmail.com)


